Cloudbuster
Construction Details
[back] Orgone generators & some
tutorials
The following was written by
Don Croft
CLOUDBUSTER DIRECTIONS
Carol and I got these specs by dowsing, and they work very, very well, though may not be the last word, if you get my drift. Let us know at doncroft@wildblue.net if you can successfully modify it.
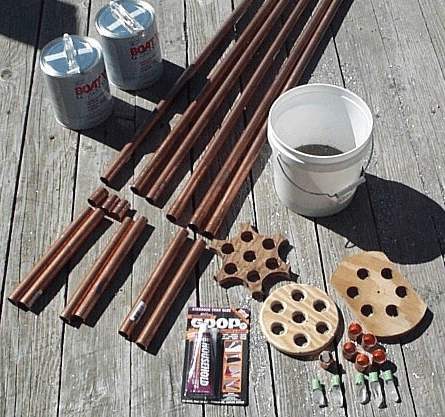
BUCKET: Base: 9" in dia., 9" deep. I use two-gallon plastic buckets from the Home Depot paint department, but two-gallon food buckets, available from restaurants, or two-gallon spackle buckets from drywall contractors are fine. I leave the buckets on, as the handles make it easier to move the finished cloudbuster.
COPPER PIPES: Six standard 1" copper pipes, 6' long, open at one end,
the capped ends submerged to within an inch or so of the bottom of the bucket
before casting. For portability and shipping, you can use 12” sections of pipe
in the base, adding five-foot lengths by putting couplers between the 12” and
five-foot pieces. You won’t need
to buy as much copper pipe this way, too.
CRYSTALS: I glued a double-terminated quartz crystal, about 2" long, into a .75” section of garden hose, and one of these devices is glued in turn inside each of the six copper end caps, pointing in the same direction as the pipe will be after the cap is glued on. I use 'Goop' glue. I taped around the cap where it joined the pipe to prevent resin from leaking into the cap during casting.
[2008] Single terminated work fine.
METAL PARTICLES: Get some metal particles from a machine shop,
recycling yard or a place where they saw a lot of aluminum (sign shops and
aluminum fabrication shops are good places to look). I use aluminum for weight
considerations, but ANY metal will do. Very fine particles (such as filings from
a key-making machine)
aren’t quite as good as ones that will easily go through a window screen &
slightly bigger ones are okay. There really is a wide margin of suitability! .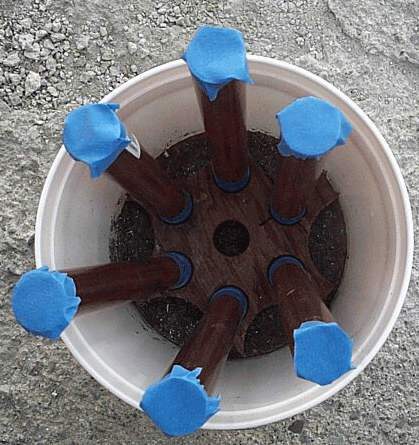
PLYWOOD: Template 1 - 3/4” exterior plywood is used to make the base for the copper endcaps/pipes. I arrange the six pipes evenly around a 2 1/2” radius circle, which makes the pipes 2 1/2” apart on centers. A flat, 1 1/4” auger bit drills a suitable hole for each end cap.
Template 2 - Make another piece to fit inside the rim of the bucket. Remember to cut a section away so you can fit your fingers under it to remove it from the bucket. This piece is not part of the finished CB, just used to get the spacing for the pipes right during construction. Cut the holes in this with a 1 1/8” flat bit so that it will fit well over the six pipes. This piece will hold the pipes in position while the second batch of resin hardens.
Template 3 - I make a circular plywood spacer for the top ends of the pipes, 4” radius with 1 1/8” holes on the same 2 1/2” radius circles for the pipe ends. This keeps the pipes parallel with each other and fairly rigid so you can point it at unholy things like predatory entities and City Hall ;-)
CLICK HERE TO VIEW THE TEMPLATE
RESIN: I use polyester resin (used to build fiberglass boats) but epoxy also works, as does envirotech resin from www.eti-usa.com (this sets up very quickly, so you need to be proficient with it). (If you are going to construct many of these units, try to purchase your resin in 5 gallon buckets over the internet, possibly from a surfboard or boat manufacturing supply company. ACE hardware for $12.95 per gallon. Home depot gets $24 per gallon for resin.
On a level surface, pour an inch or so of catalyzed resin into the bottom of the bucket and stir in metal particles until the surface is uniform and flat.
The ratio that seems to work is approx. one part resin to one part metal particles.
Put the base wood Template 1 onto that before it hardens, so that it just touches the surface and doesn't sink in much. Pour a half gallon of catalyzed resin into the bucket after the six pipes are set into the holes in the base template. Use the dowel to stir in handfuls of metal particles in the same ratio as before. Note that the wood Template 1 should not be pushed down to the bottom of the bucket with the resin squishing over the top.
Expeditiously move the Template 2 down on to the six pipes until it is snugly
within the rim of the bucket. Put the top Template 3 onto the top of the pipes
and move them until the pipes are parallel. After the resin has hardened, remove
the second template and set it aside. This is only used during construction, as
I mentioned.
You can finish off putting the resin/metal mixture in now in two stages if you
want, up to within a half inch of the rim of the bucket. Now it’s finished (wait
until it hardens before you shoot anything ;-)![]()
A MONEY SAVING SUGGESTION, ALSO FOR BETTER PORTABILITY:
Cut six pipes, 12" long, and put the crystals/endcaps on them for the base. Buy six joints which allow a pipe to come into them from both directions and stop at the middle. This allows you to make the rest of the pipe assembly from three pipes, 10' long, cut in half. The finished product leaves you with only one piece of pipe, four feet long leftover.
When positioning the 12" pipes for pouring the second layer of mix, temporarily tape the top ends of the 12" pipes so no metal particles are dropped in them by mistake.
After the mix is made, take off the tape and push the rim plywood piece down onto the pipes so that it fits into the rim of the bucket.
Put the spacers, then the 5' pipes onto the 12"base pipes, then put the third (top) plywood piece onto the tips.
The pipes will look skewed, most likely, so just twist the top plywood piece around until the pipes line up parallel. As you do that, the rim plywood piece will move around. You need to do this expeditiously, though not in a hurry, so that the resin doesn't harden before you're done.
We experimented with 5' extensions to the pipes to increase the range. It had a strong effect on the moon and on the upper atmosphere of the planet for hundreds of miles. We also apparently shut down the weather warfare facility under Homestead Air Force Base while we were in the Keys by leaving the extended cloudbuster pointing at the dead orgone field above it for a week.
We found that we don't need to point it in any particular direction in order to clear the atmosphere of bad orgone, and the longer it's left standing, the nicer it feels for a longer distance from the cloudbuster (many miles). We just stand it on its bottom, pointing straight up. We did once eliminate a belt of smog which was just off the coast by aiming at it for a few minutes, so direction can be a factor.
We also severely alarmed the operators of a ufo that was in the vicinity. It instantaneously shot out into space, where it remained in the same position relative to us, so the basic 6' long pipe configuration apparently only affects the atmosphere.
Do be discriminating which UFO’s you aim at, though. If they are not predatory and you make them mad, they may pay you back by messing with your carburetor or something, as they did to us once. The really advanced ones are not susceptible to the cloudbuster, as they apparently don’t need a deadly orgone field to operate. Our take is that all but these use nuclear fusion or some other noxious, old-paradigm energy source. It’s open season on the B Sirian craft and other predatory ones, as far as we’re concerned. They can’t hurt you, by the way, if you aren’t afraid of them. Universal law restricts them more than it does us. We can pay later for breaking it, but they are just unable to break it, apparently.
Cloudbusters destroy chemtrails consistently. It may take a few days for your cloudbuster to activate the environment enough to do this, but after that point the spew will disappear within seconds of leaving the UN jets and dissipated trails that drift within range of the cloudbuster will also disperse, but more slowly. The ones that are made up of solids take longer to dissipate, but we’ve found that these only make up about 10% or so of the spewing episodes.
The evil intent of the UN is most apparent to me in the fact that Lucis Trust (formerly Lucifer Trust) publishes all of its official literature and dictates its philosophy. Only this belief system, which closely resembles the doctrine of the Nazi party, could condone the rampant genocide which is now being carried out by the UN.
Dr. Reich’s cloudbusters were extremely dangerous when in operation since he had no orgone generator attached to them. Bad orgone does carry a charge which can quickly drain one’s life force away when it’s concentrated in one spot. It's slightly similar to a strong positively charges static electrical field. When cloudcover is unproductive or unbalanced (too much lightning, for instance, or too much rain) the cloudbuster busts it up. We plowed a furrow through a line of artificially created thunderstorm in June, 2001. Carol said the square-shaped thunderheads were chock full of predatory ET's, bent on mutilating animals at the time.
It also stops droughts. Overall, it just balances the weather, I think it sort of mediates between the ground and the atmosphere somehow. The one in Namibia finally brought heavy rain to the desert there. It happened 9/5/01, and continued for several days. Gert, the fellow who made the cloudbuster and reported the occurrence, told me that this had simply never happened in the Namib desert before to the best of anyone's knowledge. It's arguably the driest region on the planet.
WARNING: If you touch the pipes when they’re drawing in strong unbalanced or dead orgone and don’t put your hand on the base after that, you may experience headaches, even into the next day, as a friend of ours did recently.
Mind you that our efforts, though somewhat pioneering, should be seen mainly as a springboard for further developments rather than the last word.
Somebody's starting a list for cloudbuster aficionados shortly.
SUGGESTION: If you want even more rain, try putting water on top of the material in the bucket and/or hosing down the whole apparatus daily.